Quick twitter bots with AWS Lambda
So yesterday, on a whim, I pulled some of Voyageur’s generator content into a Twitter bot. The Galactic Food Bot tweets procedurally-generated futuristic street food mélanges periodically.
This bot exemplifies a botmaking workflow using Node.js and AWS Lambda. It allows for more flexibility than using a service like Cheap Bots Done Quick, without the need to manage or deploy a full server of some kind.
This tutorial assumes some familiarity with Javascript in general and Node specifically (and you’ll need an installation of Node.js, preferably Node 4). Besides that, you don’t really need to understand the Twitter API to do this.
Some familiarity with AWS is also helpful but not required. Amazon Web Services is of course Amazon’s cloud computing platform. It has a free usage tier that is useful for trying things out without having to spend money. AWS Lambda, which we will be using, is a service that runs code on the cloud in response to certain events triggered by other Amazon services. It dispenses with needing to set up a real server to do this, which is useful. It also has a free tier with no time limit; low levels of Lambda usage are free for new and existing AWS user accounts. And unless you use AWS to make hundreds of bots, you will stay in that free tier (at least, at the time of writing this is the case).
Since this tutorial is an example, we’ll be making a simplistic bot, Chirpy, that just posts “Chirp! Chirp!” every other hour or so. This tutorial is really about setting up a Twitter bot that runs arbitrary Node code in the cloud, and you can use anything you like as the bot’s logic for generating tweets. The food bot uses Improv, for example. The major limitation here is that this method is only really useful for bots that post on Twitter periodically of their own accord, and not for interactive bots that respond to mentions or DMs.
Step 1: Setting up
First, let’s set up a folder where we’ll write the code for our bot:
$ mkdir chirpy-bot
$ cd chirpy-bot
$ npm init
We’ll be using npm to manage packages, of course. The reason this is so easy is that we’ll be using a lot of Node libraries. You can see the finished bot code at the github repository I set up for it.
Next, we need to create a Twitter account for our bot. We’ll just need an email address for that account; you don’t need a phone number. If you have a Gmail account, you can create subaddresses that redirect incoming mail to your main inbox, and Twitter seems to accept those as new addresses.
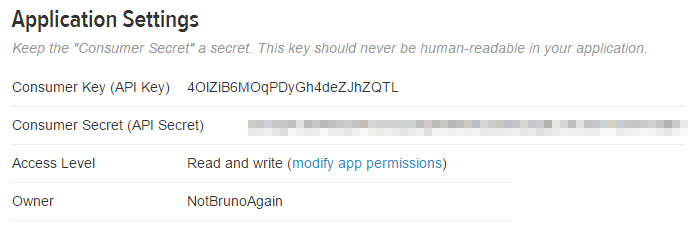
Finally, we need to set up a Twitter app for our bot; this will give us API keys that we can use to securely access the Twitter API with our bot code. You can actually just set up one app for all your bots, though I went ahead and set up a new one for Chirpy. Go to apps.twitter.com and set up a new app. Do this from your main account, not the bot account; I’ll be showing you how to get API keys specific to the bot’s account in a second. Setting up apps with post permissions on Twitter will require having a phone number associated with your account.
Make sure your app has permission to post on Twitter (that is, that it’s not read-only). Note the API key and secret.
Step 2: Getting API keys
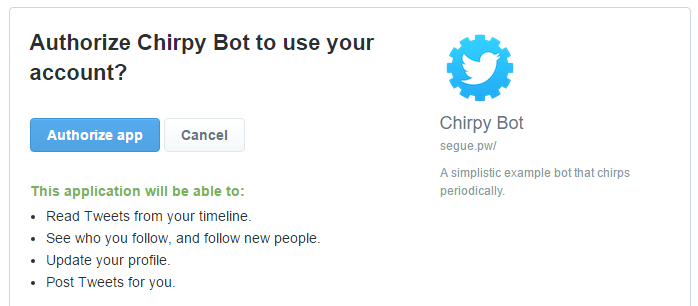
Twitter’s API uses OAuth to authorize users. OAuth, in the context of Twitter, is a way for users to authorize apps to use their accounts, without exposing their real login credentials (password) to the app. That way, the user can revoke that authorization unilaterally and easily without having to involve the app or change their password, because the authorization tokens are unique to each app-user pair.
When you created your app, you got a pair of app-specific API keys (a key and a secret) that your app uses to identify itself to Twitter. You will also need a pair of user-app keys, created by authorizing the app to use the account in question.
Normally, this is done via a webpage or app, but we don’t wnat to set that up for our bot. So we’ll be using PIN authorization. We’ll ask Twitter for an authorization link, log in as our bot account through that link, and get a PIN back. Then we’ll give that number back to Twitter, and Twitter will respond with authorization keys. This is intended to allow Twitter integration in situations where you can’t open a web page, like say a toaster that tweets whenever you toast, but it’s also a handy way of getting API keys for any arbitrary account on an app that you control.
Here is a simple Node script for PIN authorizing any app:
var TwitterPinAuth = require('twitter-pin-auth');
var fs = require('fs-jetpack');
var ncp = require('copy-paste');
var prompt = require('prompt');

var auth = fs.read('api_keys.json', 'json');

var twitterPinAuth = new TwitterPinAuth(
  auth.consumer_key, auth.consumer_secret
);

twitterPinAuth.requestAuthUrl()
    .then(function(url) {
        console.log('Received auth URL...');
        ncp.copy(url, function () {
          console.log('URL pasted to clipboard');
          prompt.start();
          prompt.get(['PIN'], function (err, result) {
            twitterPinAuth.authorize(Number(result.PIN))
              .then(function (data) {
                console.log('Access token:', data.accessTokenKey);
                console.log('Access secret:', data.accessTokenSecret);
                ncp.copy('Access token ' + data.accessTokenKey + '\n' +
                'Access secret ' + data.accessTokenSecret);
              })
              .catch(function(err) {
                console.error(err);
              });
          })
        })
    }).catch(function(err) {
        console.error(err);
    });
If you cloned the Github repository, this will be in there as auth.js. You don’t really need to understand this script (and, honestly, you don’t want to, because it mixes callbacks and promises and therefore is sinful and bad). But it provides a simple terminal-based interface to PIN authorization.
Note that it doesn’t contain the API keys in the source code; that way I can upload this to github without exposing the login credentials for my app. We’ll be using a separate json file containing our keys:
{
  "consumer_key": "[consumer key]",
  "consumer_secret": "[consumer secret]",
}
Fill that in with the keys you got from Twitter, save it as api_keys.json, install the dependencies, and run it:
$ npm install --save twitter-pin-auth fs-jetpack copy-paste prompt
$ node auth.js

You will get a link (copied to your clipboard). Go to that link while logged in as your bot account, and you will get a PIN from Twitter to confirm the authorization. Type that back into the terminal, and you will get the access tokens to use the Twitter API. Add those tokens back into that same json file; our actual bot code is going to use it:

Now we are ready to start writing our actual bot.
Step 3: Writing a bot
Our bot is very simple; it just generates a random number of chirps and tweets them. We are using the Twit library to handle the Twitter API, so we don’t have to think too hard about it:
var fs = require('fs-jetpack');
var Twit = require('twit');

var auth = fs.read('api_keys.json', 'json');
var t = new Twit(auth);

function chirp () {
// Returns a random chirping noise
// Originally, this bot only tweeted "Chirp!" repeated a random
// number of times. This isn't enough variation for a bot; the
// Twitter API will reject duplicate tweets. So instead we have
// a 5 unique bird noises, repeated 1 to 7 times, for 97655
// possible tweets.

  var chirps = [
    'Chirp!',
    'Tweep!',
    'Chirrup!',
    'Twip!',
    'Peep!'
  ];

  return chirps[Math.floor(Math.random() * chirps.length)];
}

function generateTweet () {
  // Generate a random number from 1 to 7;
  var n = Math.floor(Math.random() * 7  + 1);
  // Create a string of that many chirps
  return Array(n).fill('').map(chirp).join(' ');
}

exports.generate = generateTweet;

exports.tweet = function tweet () {
  if (Math.random() > 0.5) {
    console.log("Not tweeting right now");
    return;
  }

  function callback (err, data) {
    if (err) {
      console.error(err);
      return;
    }
    console.log(data);
  }

  t.post('statuses/update', { status: generateTweet() }, callback);
}
Don’t forget to install Twit: npm install --save twit.
We can test this bot by loading it as a Node module and running the “tweet” function.
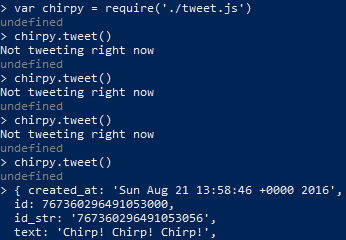

If all works well, we are ready to upload this to AWS Lambda and run it on the cloud. We would need to include the libraries that we’re using. We can upload the node_modules folder along with our bot script, of course, but if you’re on Windows like me, moving around node_modules is exceedingly slow because Windows handles the long, extremely deep file paths that npm creates very poorly.
So, instead, we’re going to bundle everything into a single js file using browserify. Make sure Gulp is installed globally on your system and create a Gulpfile:
var gulp = require('gulp');
var browserify = require("browserify");
var source = require('vinyl-source-stream');
var buffer = require('vinyl-buffer');

gulp.task('default', ['bundle']);

gulp.task("bundle", function () {
// These Browserify settings will make a bundle file that is a standalone
// module that can run on Node, rather than a bundle meant to be used in a
// script tag on a webpage.
  var b = browserify({
    entries: './tweet.js',
    browserField : false,
    builtins : false,
    commondir : false,
    insertGlobalVars : {
        process: undefined,
        global: undefined,
        'Buffer.isBuffer': undefined,
        Buffer: undefined
    },
    standalone: 'index',
  });

  return b.bundle()
  .pipe(source('index.js'))
  .pipe(buffer())
  .pipe(gulp.dest("./dist"));
});
Locally install the required software: npm install --save-dev gulp browserify vinyl-source-stream vinyl-buffer. And now gulp should run browserify and create a bundle file, index.js, inside dist/.
We are going to zip that file together with our json file containing authorization tokens, so make a copy of api_keys.json inside dist/ and zip them together. That zip file is what we will be uploading to AWS Lambda.
Step 4: AWS Lambda
If you don’t have one already, create an AWS account.
First, we need to set up permissions for our Lambda function. AWS permissions are pretty complicated, since they have to manage integration between dozens of services; there’s a lot of documentation to read up on. But for our purposes, we don’t need our bot to talk to other AWS services or do anything involved.
So, from the AWS management console, go to Identity and Access Management (IAM); open the Roles tab; and create a new role. Give it a name, make it an AWS Lambda service role, and attach policies to it. The least permissive policy we can use here is AWSLambdaBasicExecutionRole, but if you want your bot to integrate with other AWS services like S3, you’ll need to use something that allows that like AWSLambdaFullAccess.
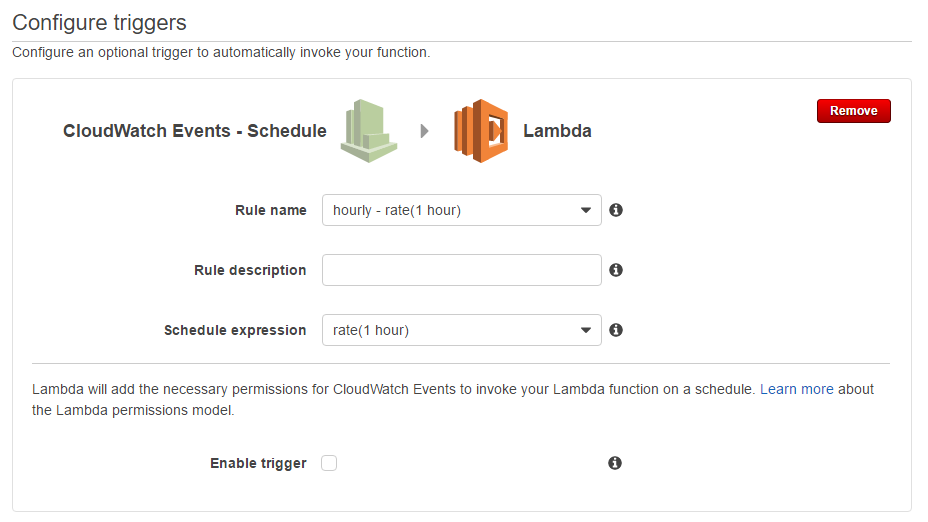
Then, finally, time to create our bot. Switch to the AWS Lambda dashboard and create a new function. We’re going to skip using a blueprint; we don’t need it here. Then we need to select a trigger; AWS has several different events that can be used to trigger Lambda functions. As our trigger, we are going to use CloudWatch Events - Schedule. For the unix-inclined, this is literally just a cron job. That is, it’s a simple AWS event that just fires periodically. In this case, we want it to run hourly. We could also set it to run every 15 minutes if we want our bot to tweet at more unpredictable times; remember to set the odds of the bot tweeting accordingly. In the code example above, we have it tweeting roughly half the time, which should average to 12 times per day if we have the function running hourly. There are 96 15-minute increments in a day, so if wanted it to run about ten times a day, we could use Math.random() < 0.1.
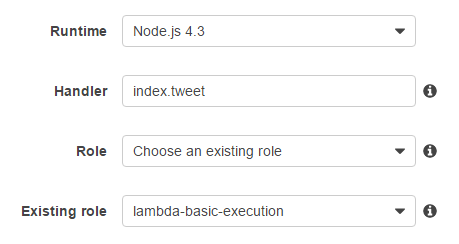
We give our function a name, set it to run on Node.js 4.3, and upload our zip file with our bundled bot code. We set our handler to the index.tweet; that is, Node will load the file index.js as a module, then try to run the function called tweet that it exports. And we give it the execution role we wanted.
Finally, after all this, we can test our Lambda function. Because the chances of tweeting are random, you might have to run the test a few times before it tweets. Make sure the trigger is enabled on the AWS lambda console, and we’re done - our bot will work autonomously from now on.
Hopefully this was helpful; I know at least that a lot of botmakers didn’t know about PIN authorization and were using other ways of getting API keys that are more time-consuming or circuitous. If you have questions or suggestions, you can always reach me on Twitter.